Showing posts with label Pinterest. Show all posts

Wednesday, 8 April 2015

DIY 'Sharpie' Mug

Happy Wednesday! I hope everyone is having a great week...mine has been a 'calm before the storm' type of week. But I'm happy to have some downtime and be able to spend this time in places that I love with people that I love. 

Today, I'm going to share a fun DIY project. There are so many pins and pictures on social media showing 'Sharpie Mugs/Plates/Bowls/Etc' and I really wanted to try this project out. I decided to make a custom mug.

Supplies:


  • Mug (purchased from the dollar store)
  • Permanent markers

Instructions:

  • Clean. I took off the sticker price tag from the store and washed my mug with dish soap and water. I would suggest doing this and running it through your dishwasher as well. Your mug needs to be CLEAN. I thought mine was clean, but there was some residue left by the sticker, which ended up being baked on to my mug. 
  • Decorate. I love this project because you can be as creative as you want, simple or complex. Since this was a test project, I decided to keep my 'design' simple. On one side I wrote 'Leading a life full of...' and on the other side I wrote 'Dreams and Colour'
  • Bake.  With the help of Google, I discovered that the mug should be baked at 350 for half an hour, which I did.
So, how did it turn out?


As you can see from the pictures, what was done in black marker turned out well. The blue, pink and red markers, although super light, are still readable. I made a mug for a friend and used a dark purple marker, which turned out similar to the blue used for 'Dreams'.

I did end up tracing everything and re-baking to see if that would make the colours stand out more, but it didn't.

Couple of things to note:

  • Not dishwasher safe. I put the mug in the dishwasher and everything more or less washed off.
  • Potentially microwave safe. I did put the mug in the microwave for about 45 seconds and I didn't notice a change to the marker colours. Full disclosure- I only did this once so I'm not sure what would happen if the mug is put in the microwave repeatedly. 
  • I know that this is called a 'Sharpie' mug but any type of permanent markers will work; Sharpie is a brand of permanent markers. I used Bic permanent markers.

The verdict?

While this is a super simple project that has the opportunity for tons of creativity and makes a great personalized gift, it really only works with black markers- which is fine, but I am a girl who LOVES colour. I have made a few of mugs for friends and they all loved them!


On the blog tomorrow...Bedtime Stories Baby Shower- Gifts & Book Recommendations.


Thursday, 30 May 2013

Project Pinterest- Crock Pot Shredded Chicken

Like everyone else, I am addicted to Pinterest and I've decided to actually try some of the things I pin. 

This month, I decided to try this pin- Crock Pot Shredded Chicken Sandwiches. The source of my pin is Mostly Homemade Mom and the original post can be found here.

For Christmas, I got a crock pot, which I had asked for, and I decided it was finally time to try it out. I checked out a ton of crock pot/slow cooker recipes that I had pinned and thought the shredded chicken would be the best one to try first- It looked easy, not a lot of ingredients and ingredients that were easy to find.

You will need:


  • Crock pot
  • 3-4 boneless, skinless chicken breasts
  • 1 packet onion soup mix 
  • 1/4 zesty Italian salad dressing
  • 1/4 cup water
  • Garlic salt to taste
  • Buns
  • Cheese 
Place the chicken in the crock pot and cover the chicken with onion soup mix, garlic salt (I didn't have garlic salt, so I used garlic powder and salt), salad dressing and water. Cook on high for 4 hours or on low for 8. Once done cooking, shredded chicken in the crock pot with a fork. Serve chicken on a bun with cheese.


The Verdict:
This is REALLY good! Super easy to make, smelled delicious while cooking and tasted really good. This is something I would make again- and, actually, already have! The original recipe said to serve on buns with cheese, as this is a recipe for a sandwich, which I did and it was good. I've also added the pulled chicken to pasta (noodles with oil, no sauce), which was really good and I've had this chicken on it's own...just brought some to work and had it for lunch.

Something to note: I'm not sure if this is just my crock pot or not...the first time I made this recipe, I cooked it on low. The chicken was moist, easy to pull apart and there was some extra 'sauce' to coat the chicken in. The second time I made this, I cooked it on high. The chicken wasn't as moist, it was harder to pull apart, no extra sauce and portions of the chicken weren't even coated. In the future, I will be making this on low only.

Something else to note: both times I made this, were days I happened to Skype with Justine!

You can find me on Pinterest here.


Friday, 26 April 2013

Project Pinterest- 52 Week Money Challenge

Like everyone else, I am addicted to Pinterest and I've decided to actually try some of the things I pin. 

This month, I decided to try this pin-52 Week Money Challenge. The source of my pin is imgfave.com but not sure that this is where the pin originated from. The pin from imgfave.com can be found here.

Everyone is always in a position where they need to save money but not necessarily in a position to actually save. For example, I need to save money for a new car but with all of my set expenses and all the surprise expenses, it's difficult to actually save. 

When I found the 52 Week Money Challenge, I knew I had to give it a try.

You will need:
  • A place to keep your money (bank account, money jar, etc)
  • Money
  • This chart:


The Verdict:
This challenge seemed simple and easy to follow. The good news, it actually is! The amounts you are saving are manageable and the increase of $1 from week to week doesn't put a strain on your overall budget...it's only $1 more than the previous week. But it all adds up. I like that the chart shows you both what you are adding to the savings and what the balance is.

I haven't completed the 52 weeks, but I'm enough weeks in to know this is something I can stick too. This is also something I plan on doing year after year- or 53 weeks after 52 weeks.

You can find me on Pinterest here.

Friday, 29 March 2013

Project Pinterest- Faucet Build Up

Like everyone else, I am addicted to Pinterest and I've decided to actually try some of the things I pin. 

This month, I decided to try this pin-how to remove build up from your shower head, which originated on In This Crazy Life. The original source can be found here.

My shower head didn't have build up, but my kitchen faucet did. Using the information from In This Crazy Life, I decide to try this on my kitchen faucet. 

You will need:
  • Bag
  • Vinegar
  • Elastic
I used a ziplock bag, which I filled about half way with vinegar. I put the faucet in the bag and secured the bag around the neck of the faucet with an elastic. I left the bag on the faucet overnight.

You can see some of the build up on the faucet


The Verdict:
It worked! When I woke up in the morning, I took the bag of vinegar off the faucet and the build up was gone from the faucet! I didn't even have to do anything, like wipe the faucet down. I was impressed that it worked and so easily. I have since done this to my bathroom faucet and if/when I get build up on my shower heard, I will use this too.

You can find me on Pinterest here.


Friday, 22 February 2013

Project Pinterest-Rolo Stuffed Crackers

Like everyone else, I am addicted to Pinterest and I've decided to actually try some of the things I pin. 

This month, I decided to try this pin-Rolo stuffed Ritz Crackers, which originated on Something Swanky. The original post can be found here.

When I saw the pin on Pinterest, I knew this was a snack I wanted to try to make. It looked simple and delicious. Plus, I thought that if I have the ingredients on hand, these are easy to pull together if I have last minute guests.

You will need:
  • Rolos
  • Ritz Crackers
 I couldn't find regular sized Rolo so I used Mini Rolo.
 
Place crackers on a cookie sheet, top with Rolo (because they were Mini, I used two per cracker) and bake at 350 until chocolate is melted.

Top with a second cracker, let cool and enjoy.


The Verdict:
These were so easy to make and tasted really good. In fact, I've made these several times! A couple of things to note...I baked them for about 5 minutes. The chocolate won't be melted, but will be soft enough that when you press the second cracker down, the Rolo will get squished.

I tried making them with one Rolo per cracker and two Rolos per cracker and if you used the Mini Rolo, you definitely need to use two. I later made these using full size Rolo and the cracker/chocolate/caramel ratio was much better.

The original post from Something Swanky said to bake them. I have since started making these in the microwave, which is much quicker (about 20 seconds). I've served this both right after making them (when the Rolo is still warm) and after they've cooled (allowing the chocolate/caramel to harden). Both ways are good.

I've decided to keep Rolos and Ritz Crackers around so that I can make this at a moments notice. This is a pin that worked and one that I will make again.


Friday, 25 January 2013

Project Pinterest- Removing Wax From Containers

Like everyone else, I am addicted to Pinterest and I've decided to actually try some of the things I pin. 

This month, I decided to try this pin-how to get wax out of old candles so you can reuse the containers, which originated on Yellow Brick Home. The original source can be found here.

The only candles I have are tea lights, so need to reuse those containers. But I love wax tarts/melts and I always struggled with how to get the wax out of my burner. Using the information from Yellow Brick Home, I decide to try this for my burner. 

You will need:
  • Boiling water
  • A container with wax in it- candle holder or wax burner
 As you can see, I didn't start with a a lot of wax in my burner, but it was still hard (prior to pinterest) to get it out. 
I added boiling water and the wax started melting right away, which you can see above. 

Once the wax melts, it floats to the top. It was tempting for me to scoop the wax out, but following the advice of Yellow Brick House, I didn't.

As suggested, I left it over night, and this is what it looked like in the morning, It was easy to scoop the wax out and/or break it away from the sides. 


The Verdict:
I'm not sure. It worked the first time I did it, but not all times. I did try this on a variety of different kinds (ie Yankee Candle, Scentsy, etc) of wax tarts. I found that while some tarts didn't melt and float to the surface (as pictured above), sometimes the water would get under the wax (which you couldn't tell just by looking at it). I this happened, it was easier to get the wax out of the burner- cut through the wax and lift. But again, didn't always happen. I also learned it was important to use boiling water, not just hot water.

Tuesday, 4 December 2012

Hey! It's Ok

Idea taken from Amber at Airing My Dirty Laundry One Sock At A Time
 
To love the movie Christmas Magic. I'm turning into such a sap.
 
To be happy that Kate is pregnant. I was getting tired of the whole 'Is she/Isn't she' debate. Now we know for sure.  
 
That Christmas is only 21 days away! Where has the time- and 2012- gone?!?!? I'm a bit behind in my holiday preparations, but I'll get it together. It would be helpful if time slowed down a bit...
 
To be verified on Pinterest! Or my blog is verified on Pinterest. Thanks to Chelsea at Yours Truly...she helps me with all my tech stuff (she did my blog design and made a Christmas image for me too)...that lady is amazing!
 
To hope my brother goes home this weekend. If he does, I will and since we both (and our sister) will be home, our parents will put up our Christmas tree! My mom has a rule that our tree can't go up until we are all home to decorate it. This usually ends up being Christmas Eve, so it'll be nice to put it up earlier.

That I have an Advent calendar. I've had one every year since I was a kid. (Friday I'll be posting two Advent calendar stories.)


Friday, 30 November 2012

Project Pinterest- Magnet/Cork Board

I can't believe that today is the last day of November! This month has flown by and too quickly! One of my favourite things is that today is the last day of Movember- thank goodness!
Like every other person, I am addicted to Pinterest and I've decided to actually try and make some of my pins. My first Pinterest project was a magnet board. I couldn't find the original Pin, but you can find a similar one here (originally taken from here). 

I decided to modify the Pin and add a cork board as well. 

You will need:

  1. Magnets
  2. Fabric
  3. Hot glue gun
  4. Cookie Sheet
  5. Glue gun sticks
  6. Push pins
  7. Cork
All material, with the exception of the fabric, was purchased at The Dollar Store. The fabric, I picked up at a local quilting store.

I started by cutting the cork to fit half of the cookie sheet (I actually got my dad to do this).

Next, I covered the bottom part of the cookie sheet with a piece of fabric, gluing the fabric to the inside of the cookie sheet. I covered the cork in a different piece of fabric.

I then glued the cork to the fabric covered cookie sheet.

The final, and most challenging, part of this project was the magnets. I would suggest just buying magnets you like, so much easier. But I covered the magnets in fabric. After several attempts and methods, I just cut circles in the fabric and glued the circle on top of the magnet.

The finished product:


I originally wrote about this project back in February, as one of my Favourite Things. You can find my original post here.

Thursday, 15 March 2012

Make With Me- Yogurt Dots

Ingredients/Materials:
  • Flavoured yogurt of your choice

  • Ziplock/sandwich/etc bag

  • Baking/cookie sheet


To make:

  • Spoon yogurt into bag

  • cut the corner of the bag

  • Squeeze yogurt onto baking sheet, making small dots

  • Put the baking sheet in your freezer (roughly an hour)

  • Remove frozen dots from baking sheet 

  • Enjoy!


Notes:
  1. Saw a picture of this recipe on Pinterest and from the picture figured out how to make it (yes, I know it would have been easier to click on the link).  
  2. The first time I made dots, I used cappuccino flavoured yogurt. The second time, I used different fruit flavoured yogurt. While the I still made individual dots (one flavour per dot), when serving I added the different flavours to the same bowl.   
  3. I have made a batch of yogurt dots and keep them stored in a plastic container in my freezer.
  4. They make the perfect snack!


Friday, 24 February 2012

Favourite Thing- DYI Magnetic Board

Anyone who knows me, knows that I am not a DIY-er, crafty, organized, neat or even patient for that matter.

I recently came across a DIY magnetic board on Pinterest (you can see the original post here) and thought that was maybe something I could make. You could even say I was inspired. I thought it seemed pretty easy and thought I would step it up a notch and make a half magnet board, half cork board.

So, a week ago, I set out on my little project.

The supplies:


Fabric:

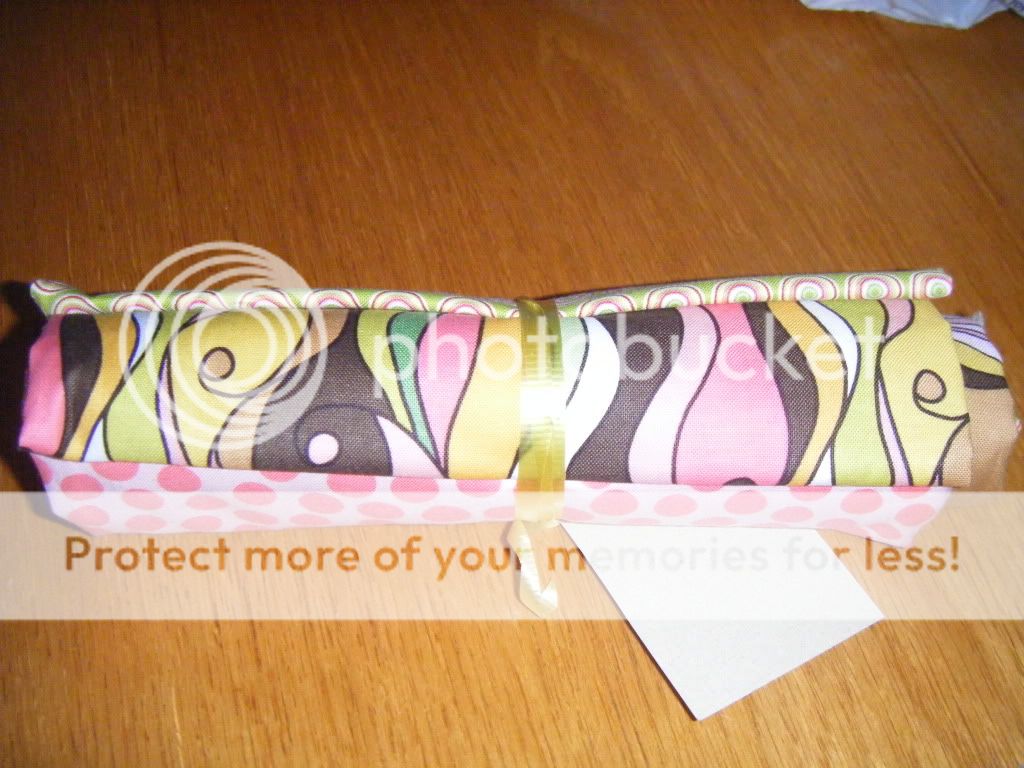
There is a quilting store in town. I had to drop something off there for work, and while there I decided to look at the fabric. I ended up finding a bundle for 4 fabrics, which I thought were reasonable priced ($15 for 4 pieces, all big each big enough to make a pillow case) and I was drawn to two of the fabrics. Honestly, it was finding these fabrics by chance that resulted in my attempting this project.


I LOVE the pink polka dot fabric and the green fabric with polka dots.
Next, I was off to the dollar store where I picked up:


Craft Magnets


Cork board (the package had two boards in it)


Push pins (for the cork board)


Hot glue gun (which I didn't buy at the Dollar Store) & hot glue gun sticks


Cookie sheets (aka baking sheets)
Next stop was home to attempt to be a crafty DIY-er.

To make:
  1. Cut cork board to desired size
  2. Wrap fabric around cork board, secure with hot glue
  3. Wrap fabric around cookie sheets- the bottom of the sheet will be the front of the magnet/cork board- secure with hot glue
  4. Glue cork board to cookie sheet
  5. If needed, make magnets and/or push pins

     
Seems pretty simple (and it was, for the most part).

Luckily, my dad came to visit for the weekend. He actually was kind enough to cut the cork board for me. I wraped the cork board in the pink polka dot fabric and I wrapped the entire cookie sheet in the green fabric.
The biggest challenge for me (besides being patient during the project and trying not to get hot glue everywhere) was the magnets.

I wasn't really sure how to go about making magnets. I originally tried wrapping the entire magnet in fabric, which didn't work well. I then tried wrapping a button in fabric and then gluing the button to the magnet. This worked better but wasn't great (not to mention I didn't have any more extra buttons kicking around). In the end, I cut out a square piece of fabric, glued it to the magnet and then cut the extra fabric to make the fabric round. Again, not the best, but better.

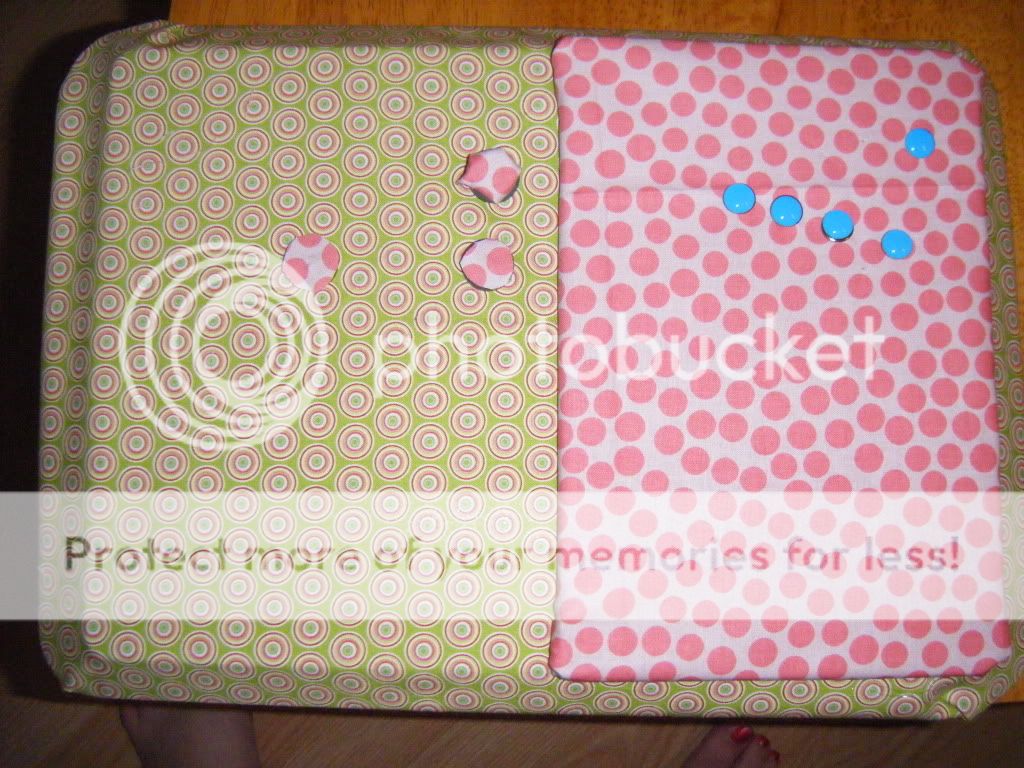
This was my final product:


It's not perfect, but I think it turned out pretty good for a first attempt!
The magnet on the upper right is the button magnet. 

My dad (bless his heart) agreed to attempt to be crafty with me. This is what he came up with:


A bit different then mine.
As you can see, my dad glued the fabric on the inside of the cookie tray and then glued his piece of cork on top.
He also made his own magnets- he glued screws on to the magnets so they would have 'handles' and be.


To summarize: My favourite thing this week is my homemade magnet/cork board. NOT DIY projects.

Although after this, I think I might have to attempt some more DYI projects.

Tuesday, 7 February 2012

Hey! It's Ok

This idea was taken from Whispering Writer.

It's ok...

To be excited that I FINALLY got an invite to Pinterest! I requested an invite via their website about a week ago and the invite never came. I sent a random girl a Facebook message asking her to invite me and she did!

To be loving the humus and avocado sandwich I had for lunch so much, that I want to have another one for dinner (recipe to follow later this week).

To think it's funny that my boss told me I'm not allowed to have caffeine ever again. I had some this morning (not normally a caffeine person) and spent the day hyped up. My co-workers wanted to know what I was on and wanted some for themselves.

To have not watched the Superbowl. At all. Not even for the commercials or Madonna. Instead I watched What's Your Number?, Something Borrowed, and Pretty Woman.

To love the fact that Tony Lucca was on The Voice! You can watch him here.

To hate the fact that my birthday is next week. As much as I love birthdays, my own birthday kinda bums me out. And to hate the fact that Valentine's Day overshadows my birthday.